Navigation:
Synergy Outputs > Alarm Management > Acknowledging Alarms >> Acknowledge Individual Alarms
Acknowledge Individual Alarms

Contents
To Acknowledge an Individual Alarm
1.In the Showing All Sensors In Alarm window, click on the Active Alarms icon corresponding to the Sensor/Transmitter that you want to acknowledge the alarm for.
•The Acknowledging Alarm window is displayed. See Figure 586 below:
Figure 586
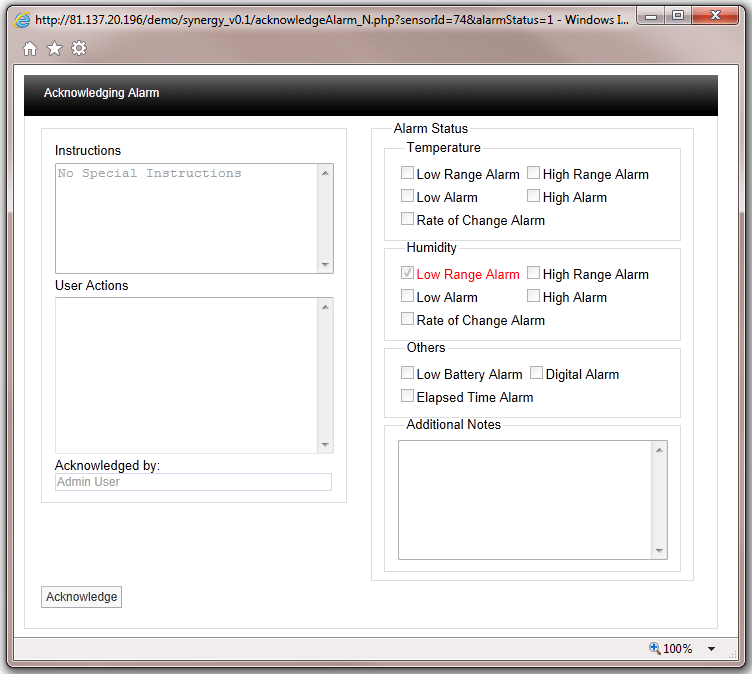
•The active Alarm will be highlighted in Red and its adjacent box will be ticked.
In this example the active Alarm is a Low Range Alarm for Humidity.
•If any instructions were added when the alarm parameters were set, these would appear in the Instructions dialog box.
For more information on instructions see the Notes section.
2.In the dialog box User Actions enter a note that is relevant to the Alarm, for example “Humidifier out of water, humidifier tank filled up”.
•You cannot acknowledge the Alarm without entering a note in this dialog box.
3.When happy click on the Acknowledge button.
•The window will close and the Alarm icon will turn Amber to indicate that it is in an Acknowledged state. See Figure 587 below:
Figure 587
![]()
•The entry for the Acknowledged alarm will also move to the bottom of the list in the Showing All Sensors in Alarm window.
When you are satisfied that the cause of the alarm has been resolved and/or the conditions have returned to normal limits, the Alarm can be Completed.
To Complete the Alarm
1.Click on the Amber icon to display the Reset Alarm for <Sensor Name> [Alarm Type: <...>] window. See Figure 588 below:
Figure 588
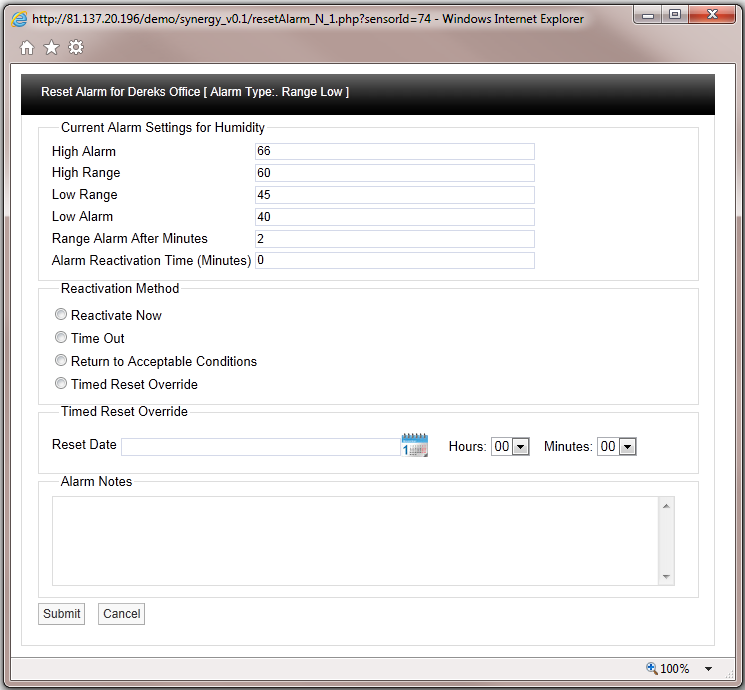
•This window allows access to the following functionality:
Current Alarm Settings
•The Current Alarm Settings are displayed at the top of the window.
•If the logged in User has the Permissions these limits can be adjusted at this stage.
•Caution Note: Any changes made here will be populated back to the main database.
Reactivation Method
There are four methods available to reset the Alarm:
•Reactivate Now
If Reactivate Now is selected, as soon as you select Submit the Alarm will be acknowledged.
•If the Alarm condition still exists the status will return to Red and a new Alarm will be generated on the system.
•If the Alarm conditions have returned to normal the Amber Alarm icon will be removed from the list.
When selecting Reactivate Now a default message “Reactivate Now was selected for this Alarm” will be entered into the Alarm Notes text box. This can be added to or overwritten.
•Time Out
If Time Out is selected, as soon as you select Submit, the Alarm will be acknowledged after the time delay entered into the Alarm Reactivation Time (Minutes) dialog box.
•If the Alarm condition still exists after the Time Out period the status will return to Red and a new Alarm will be generated on the system.
•If the Alarm conditions have returned to normal the Amber Alarm icon will be removed from the list.
When selecting Time Out a default message “Time Out was selected for this Alarm” will be entered into the Alarm Notes dialog box. This can be added to or overwritten.
•Return to Acceptable Conditions
If Return to Acceptable Conditions is selected, as soon as you select Submit the Alarm will be acknowledged as soon as the conditions return to normal limits.
•The Amber Alarm icon will remain until the conditions return to normal limits.
When selecting Return to Acceptable Conditions a default message “Return to Acceptable Conditions was selected for this Alarm” will be entered into the Alarm Notes text box. This can be added to or overwritten.
•Timed Reset Override
This feature allows you to defer the Alarm reset until a future date and time.
•To enter the required future date, select the required date from the calendar displayed by clicking on the Calendar icon.
•The selected date will be entered in the dialog box next to Reset Date.
•To enter the required time on the future date, select the time of day from the Hours and Minutes drop down menus.
This feature could be used if, for example, the air conditioning in a room or space failed and it was going to take several days to get an engineer in to carry out repairs. In this case, setting a Timed Reset Override would prevent the inconvenience of the Alarms being continually activated until the engineer arrived to repair the system.
Using this feature requires you to manually enter a note into the Alarm Notes text box.
•A suitable note for this example could be: “Engineer called to repair Humidifier unable to attend site before next Friday”
2.When happy with the details, click on the Submit button to save the changes and Complete the Alarm, or click on the Cancel button to discard the changes.