
Contents
SMS Alerts
The Synergy SMS Alert messages contain considerable amounts of data, exceeding the character limit for a single SMS message and, as such, are a concatenation of two messages.
Some older phones may not receive concatenated messages correctly. This is feature of the receiving handset, not the Synergy System, therefore, if messages appear to be corrupt, first try a different handset.
Edit/View and Existing SMS Alert Group
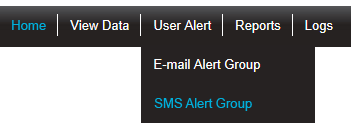
1.Select SMS Alert Group from the User Alerts main menu entry. See Figure 603 below:
Figure 603
•The Create SMS Alert Group window is displayed and the Create SMS Alert Group tab is highlighted in the left hand list. See Figure 604 below:
Figure 604
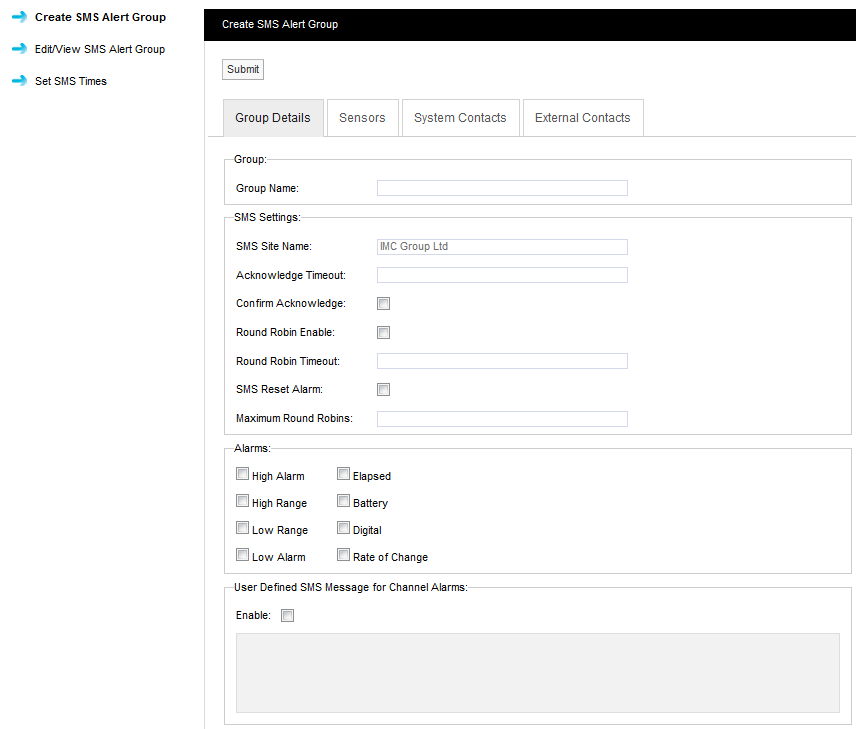
The window's four tabs allow an SMS Alert Group to be defined:
From the Create SMS Alert Group window, User Groups can be created and configured to receive automatic notification of active Alarms by SMS Text Alerts as follows:
1.Define the SMS Alert Group's Details
Select the Group tab and:
i.Enter a name for the User Group into the Group Name: field.
This can be something that makes sense to the Site in question or something related to the function. For this example we will call the group, “Service SMS” this will be a group that sends SMS Alarms to the service engineers.
iii.Enter an Acknowledge Timeout value.
This defines the length of time that the system will wait for an acknowledgement message before re-sending the message and should be entered in the format: 12:00:00 (This entry defining a 12 hour delay).
iv.Check the box next to Confirm Acknowledge if an acknowledgment SMS message is required.
v.If required, activate Round Robin mode, check the box next to Round Robin Enable:
When Round Robin mode is enabled, SMS Text Alerts are initially sent to the first name/number in the list. If there is no response from the first name/address on the list within the time limit, the system sends the SMS Text Alert to the next person in the list. This process is repeated, moving down the names/numbers on the list, until a response is received or SMS messages have been sent to everybody in the list.
•With Round Robin mode enabled, you can enter a value for the length of time that the System will wait before sending the SMS Text Alert to the next name on the list. This should be entered in the format: 00:15:00 (This entry defining a 15 minute delay).
vi.If required, a reply SMS message can be sent which will reset the Alarms.
•To activate this feature, check the box next to SMS Reset Alarm.
vii.Select the Alarm parameters that SMS Text Alerts are required for by checking the box, next to the required Alarm Condition, in the Alarms: section of the Create SMS Alert Group window.
•Multiple selections can be made.
viii.For Channel Alarms, you can define your own text message. This message can be used to trigger events on a third party system with SMS receive capability.
To set-up the required message tick the Enable check box and enter the required text into the User Defined SMS Message for Channel Alarms: text box.
2.Select the Sensor/Transmitters that you require to be included in the SMS Alert Group.
Select the Sensors Tab and:
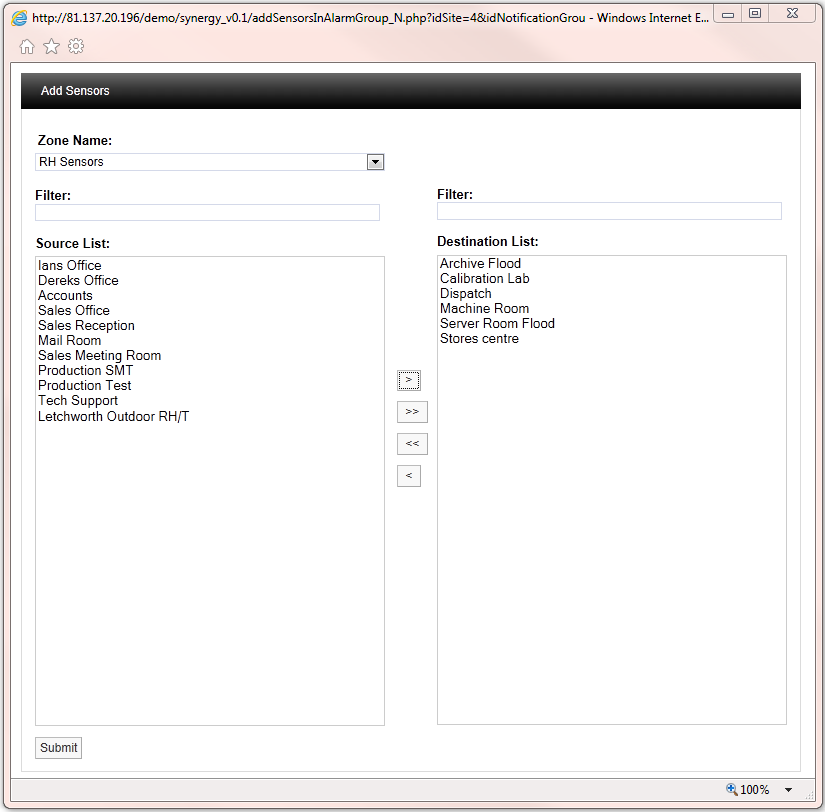
i.Click on the underlined Add Sensors link (See Figure 605 below) to display the Add Sensors window. See Figure 606 below:
Figure 605
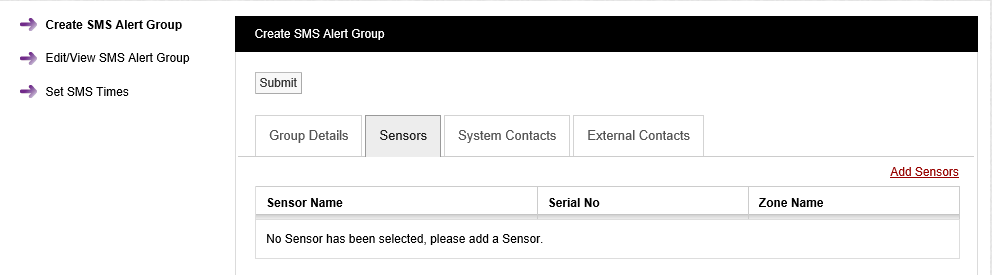
Figure 606
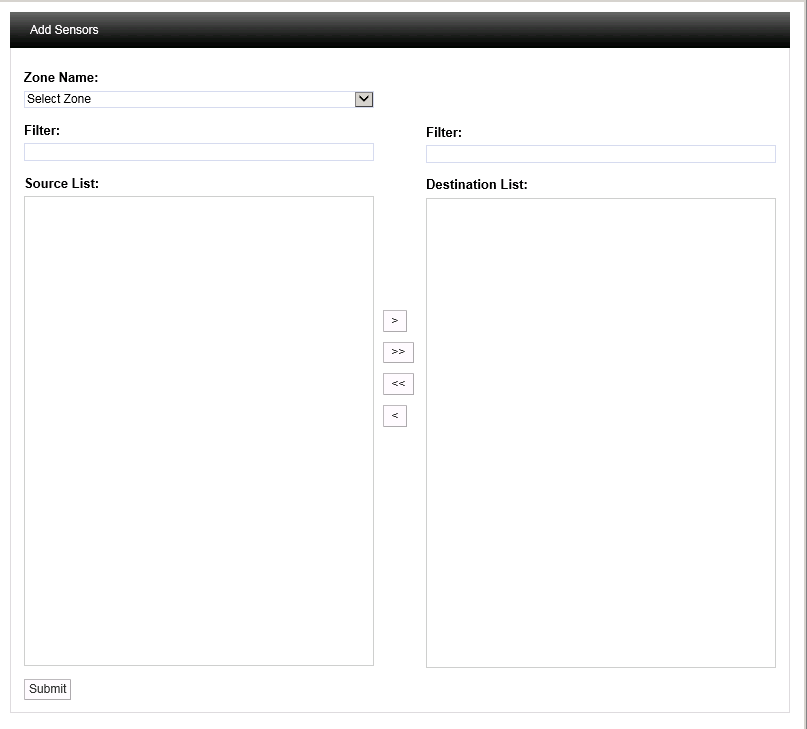
ii.Select the Zone containing the Sensors that you wish to to be included in the SMS Alert Group from the Zone Name: drop-down list.
•As the Zone is selected, the Sensors associated with the selected Zone will populate the left-hand column (Source List:).
iii.Select the Sensors you wish to be included in the SMS Alert Group from the left-hand column (Source List:).
iv.Click on the right-pointing arrow to move the selected Sensors to the right-hand column (Destination List:). These Sensors will be added to the SMS Alert Group
•To move/select all Sensors from the Source List to the Destination List, click on the double right-pointing arrow.
•To deselect Sensors, highlight them individually in the Destination List and click the left-pointing arrow.
•To deselect all Sensors from the Destination List, click on the double left-pointing arrow.
See Figure 607 below.
v.Once you are happy with your selection of Sensors, select the Submit button at the bottom left of the Add Contacts window.
•The Create SMS Alert Group window is populated with the selected Sensors.
Figure 607
3.Add Contacts to the SMS Alert Group
Select the System Contact tab and:
i.Click on the underlined Add Contacts link (See Figure 608 below) to display the Add Contacts window, see Figure 609 below:
Figure 608
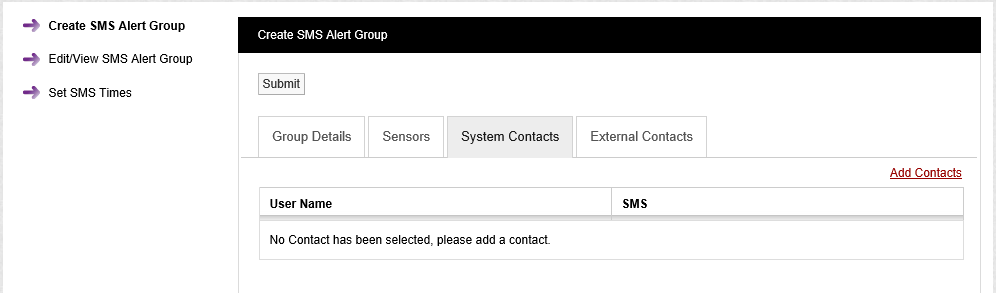
Figure 609
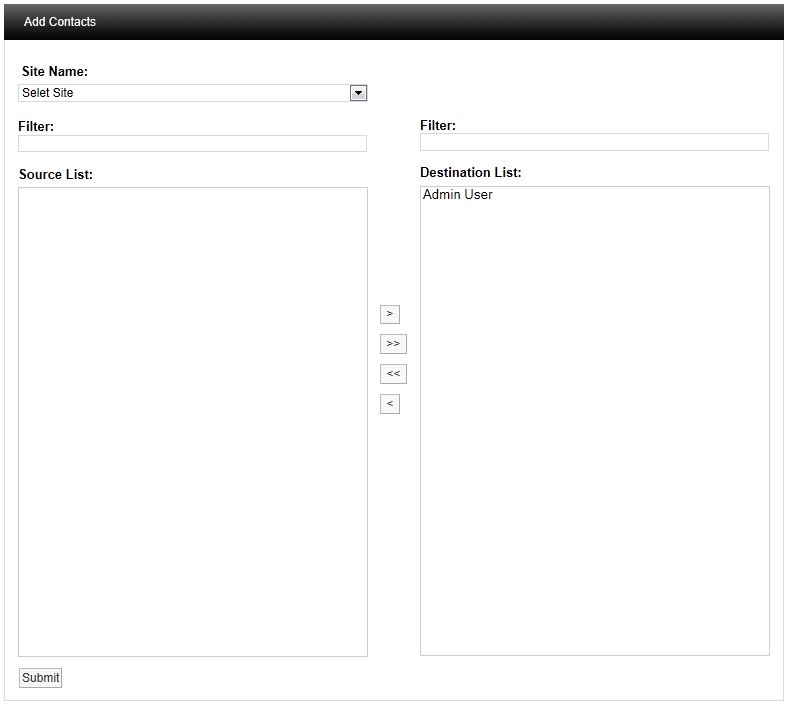
ii.Select a Site containing the Contacts that you wish to to be included in the SMS Alert Group from the Site Name: drop-down list.
•Contacts associated with the selected Site will appear in the left hand Source List: panel.
•If there are a large number of Sites/Contacts, the required Site/Contact can be found by using the Filter: fields.
To Add Contacts:
•To add a single Contact to the SMS Alert Group, select a single Contact in the Source List: panel and click on the single the right-facing arrow to move the selected Site Contact to the right-hand Destination List: panel.
•To add all of a Site's Contacts to the SMS Alert Group, click on the double arrow to move all of the selected Site's Contacts to the right-hand Destination List: panel.
| Note: | Further Sites can be selected from the Site Name: drop down list and their associated Contacts added to the Destination List: using the procedures above. |
To Remove Contacts:
•To remove a single Contact from the SMS Alert Group, select a single Contact in the Destination List: panel and click on the single left-facing arrow to move the selected Site Contact to the Source: list.
•To remove all Contacts from the SMS Alert Group, click on the double left-facing arrow to move all of the group's Contacts to the Source: list.
iii.Once you are happy with your selection of Sites/Contacts, select the Submit button at the top-left of the Create SMS Alert Group window.
•The Create SMS Alert Group window is populated with the selected Contacts and the SMS Alert Group is created.
•To add Contacts to the System see Adding New Users.
Adding External Contacts to the SMS Alert Group
There is an option to have SMS Text Alarms sent to non-Synergy Users or External Contacts.
To Select External Contacts:
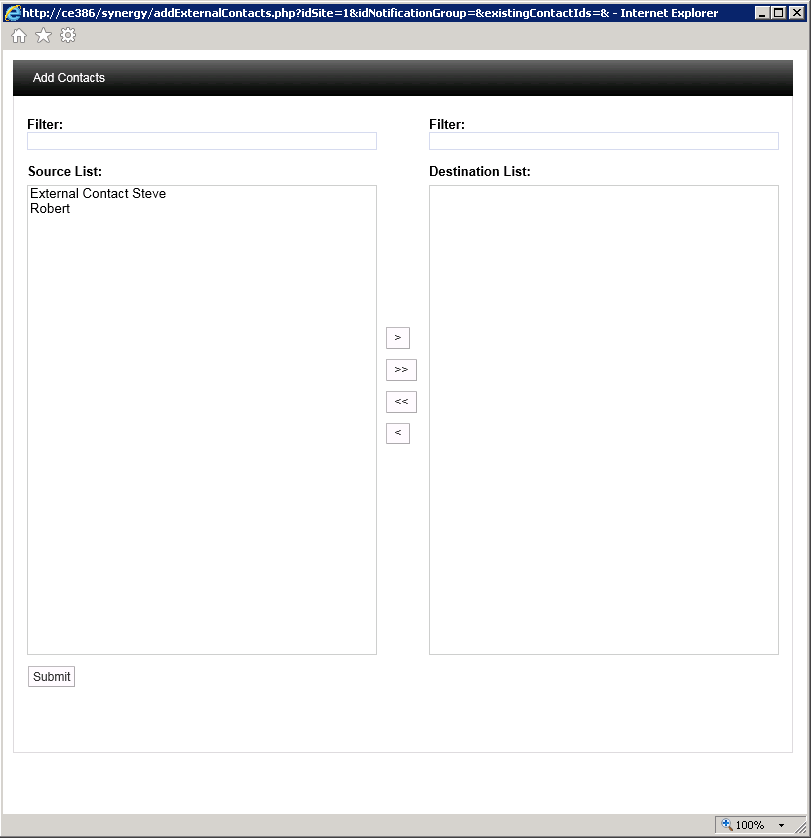
1.Select the External Contacts tab.
2.Click on the underlined Add Contacts link to display the Add Contacts window. See Figure 610 below:
Figure 610
To Add External Contacts:
•To add a single External Contact to the SMS Alert Group, select a single External Contact in the Destination List: panel and click on the single the right-facing arrow to move the selected External Contact to the right-hand Destination List: panel.
•To add all available External Contacts to the SMS Alert Group, click on the double arrow to move all of the available External Contacts to the right-hand Destination List: panel.
To Remove External Contacts:
•To remove a single External Contact from the SMS Alert Group, select a single External Contact in the Destination List: panel and click on the single left-facing arrow to move the selected External Contact to the Source: list.
•To remove all External Contacts from the SMS Alert Group, click on the double left-facing arrow to move all of the SMS Alert Group's External Contacts to the Source: list.
3.Once you are happy with your selection of External Contacts, select the Submit button at the top-left of the Create SMS Alert Group window.
•The Create SMS Alert Group window is populated with the selected External Contacts.
•To add External Contacts to the system see Adding New Users.
Editing/Viewing an SMS Alert Group
To edit or view an SMS Alert Group:
1.Click on the Edit/View SMS Alert Group tab in the left hand list.
•The View SMS Alert Groups window is displayed with the Edit/View SMS Alert Group tab highlighted in the left hand list. See Figure 611 below:
Figure 611
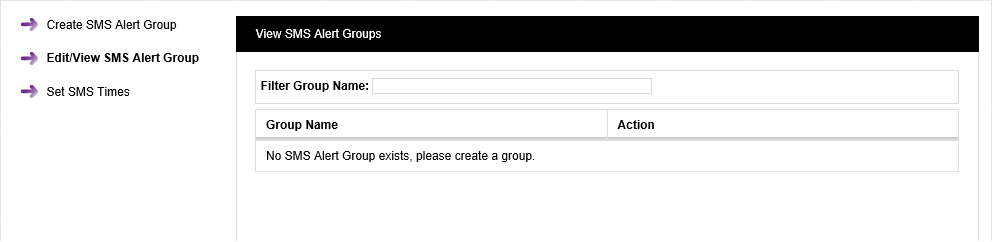
2.Type in the name of the required SMS Alert Group into the Filter Group Name: field.
•As you type a list of names containing the characters typed so far will be displayed.
3.From the list, click on the SMS Alert Group to be edited.
•The Create SMS Alert Group window (See Figure 604 above) is displayed, populated with the details of the selected SMS Alert Group.
4.Edit the Create SMS Alert Group window's fields as required.
5.Click on Submit.
The SMS Alert Group's Set SMS Times parameters define when SMS Alerts are active, ie when they can be sent, for each SMS Alert Group.
To Set SMS Times for a selected SMS Alert Group:
1.Click on the Set SMS Times tab in the left hand list.
•The Set SMS Times window is displayed with the Set SMS Times tab highlighted in the left hand list. See Figure 612 below:
Figure 612
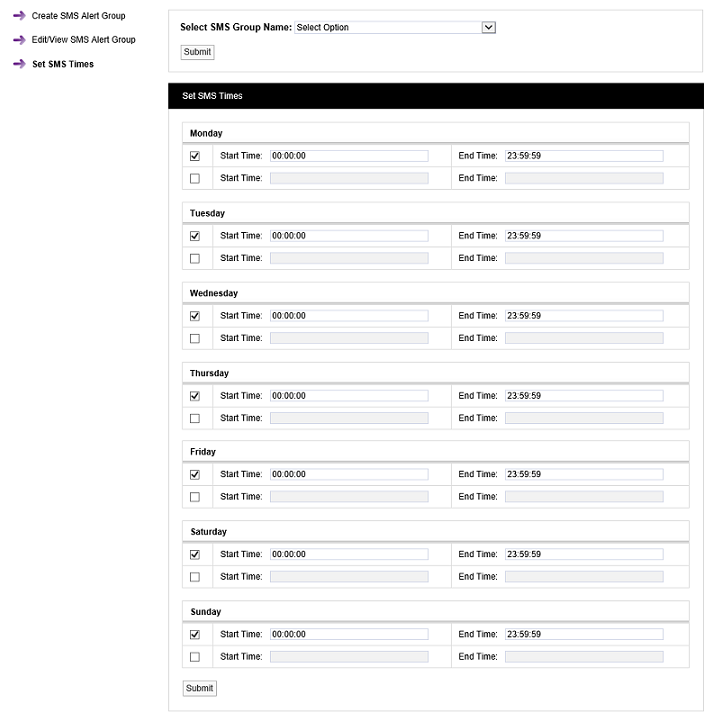
2.Select the required Alert Group from the Select SMS Group Name: down list.
3.Tick the relevant boxes under the entries to select the required 'active' days when SMS Alerts will be sent to the selected SMS Alert Group.
4.Enter the required time period during which SMS Alerts will be sent, on the selected active days, to the selected SMS Alert Group.
| Notes: | If the customer wants the same alarm(s), but different active days or times for some recipients in an Alert Group, then a separate Alert Group should be created for each set of recipients requiring different active days/times. |