Contents
You can create SMS System Groups to send SMS alerts to when any of the following System Events occur::
•Edit
Synergy is a web-based product, with a number of backend services running on a Server; a User closing the programme cannot shut it down. There are three possible shutdown scenarios: •Software Failure. •Administrator Action. •Power Failure. In order to facilitate fast shutdown, (reducing the risk of consequential data loss), the Data Service detects and writes details of a shut down to an XML file. This file is then used to generate an Activity Log entry, when the System is next started, after which the Data Service will then send SMS / Email Alerts. •Synergy has no concept of Time, Online or Offline. |
Synergy is a web-based product, with a number of backend services running on a Server; a User closing the programme cannot shut it down. There are three possible shutdown scenarios: •Software Failure. •Administrator Action. •Power Failure. In order to facilitate fast shutdown, (reducing the risk of consequential data loss), the Data Service detects and writes details of a shut down to an XML file. This file is then used to generate an Activity Log entry, when the System is next started, after which the Data Service will then send SMS / Email Alerts. •Synergy has no concept of Time, Online or Offline. |
•Login Fail
•Hardware Event
Multiple users can be allocated to a group.
•To Create an SMS System Group
•To add or Remove Contacts to or from the SMS System Group
•To Delete an SMS System Group
1.Select Admin>System Configuration>SMS System Group to display the Create SMS System Group window. See Figure 193 below:
Figure 193
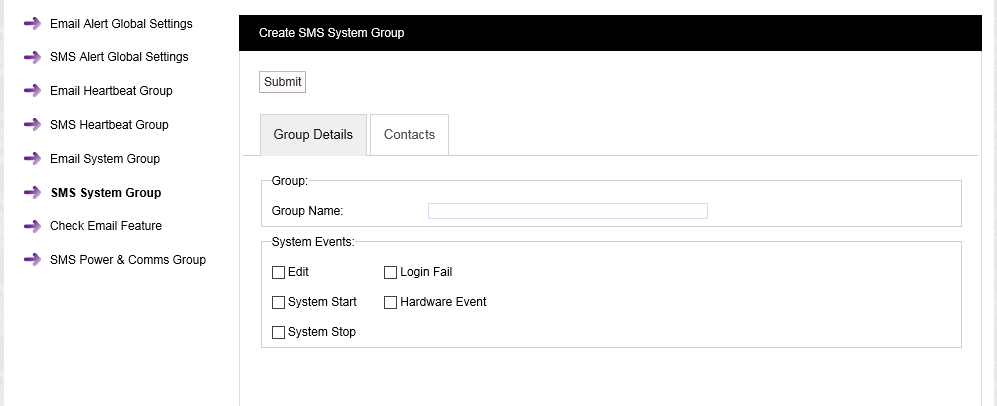
2.Enter a name for the SMS System Group in the Group Name: dialog box.
3.Select the events from the System Events: list that you require email notification for by checking the relevant box or boxes.
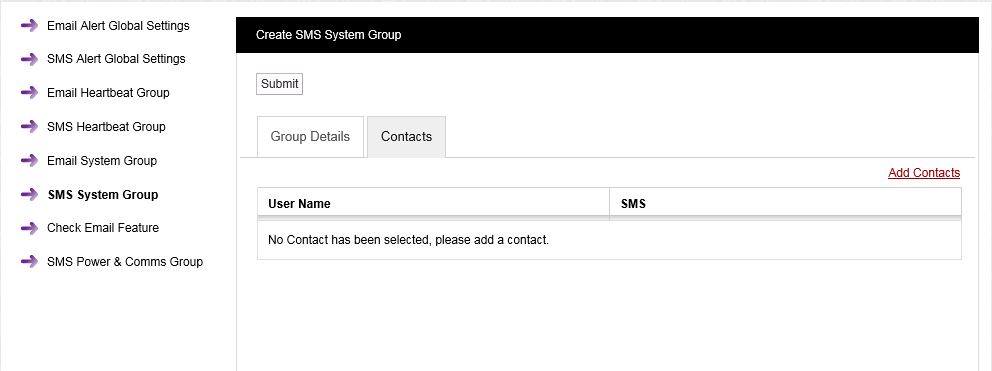
4.Click on the Contacts tab to display the Contacts pane. See Figure 194 below:
Figure 194
To Add or Remove Contacts to or from the SMS System Group
1.Click on the Add Contacts text in the Contacts pane of the Create SMS System Group window to display the Add Contacts window. See Figure 195 below:
Figure 195
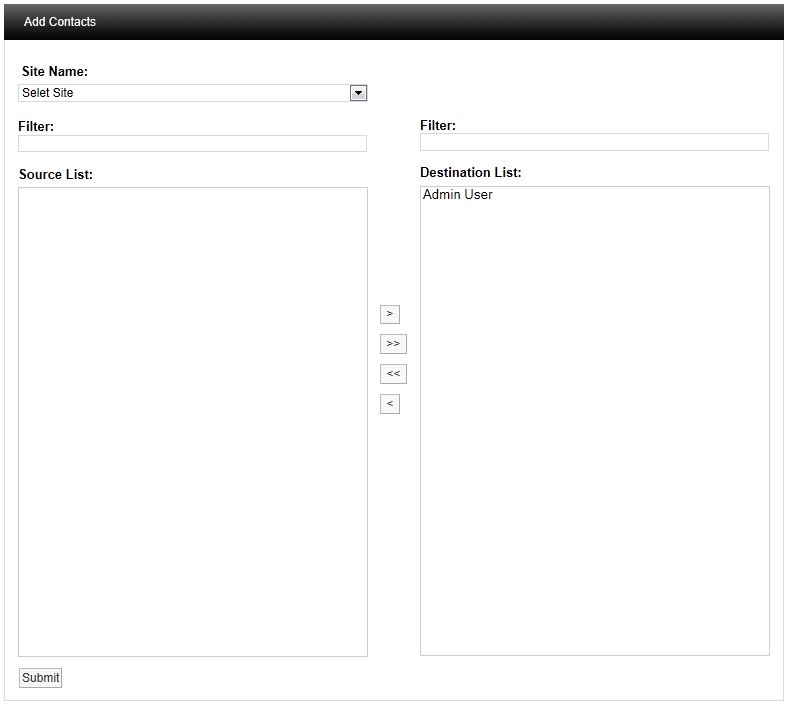
2.Select a Site from the Site Name: drop down list.
•Contacts associated with the selected Site will appear in the left hand Source List: panel.
•If there are a large number of Sites/Contacts, the required Site/Contact can be found by using the Filter:.
•On initial setup there will only be one Site available, which is created during the installation.
•See more about creating Sites in the Sites section.
3.To Add Contacts:
•To add a single Contact to the SMS System Group, select a single Contact in the Destination List: panel and click on the single the right-facing arrow to move the selected Site Contact to the right-hand Destination List: panel.
•To add all of a Site's Contacts to the SMS System Group, click on the double arrow to move all of the selected Site's Contacts to the right-hand Destination List: panel.
| Note: | Further Sites can be selected from the Site Name: drop down list and their associated Contacts added to the Destination List: using the procedures above. |
To Remove Contacts:
•To remove a single Contact from the SMS System Group, select a single Contact in the Destination List: panel and click on the single left-facing arrow to move the selected Site Contact to the Source: list.
•To remove all Contacts from the SMS System Group, click on the double left-facing arrow to move all of the group's Contacts to the Source: list.
4.Once you are happy with your selection of Sites/Contacts, select the Submit button at the bottom left of the Add Contacts window.
•This will return you to the Create SMS System Group window.
5.Select the Submit button at the top left of the window to save the changes to the Email System Group.
•If the SMS System Group's details have been successfully updated, the following window will be displayed:
Figure 196
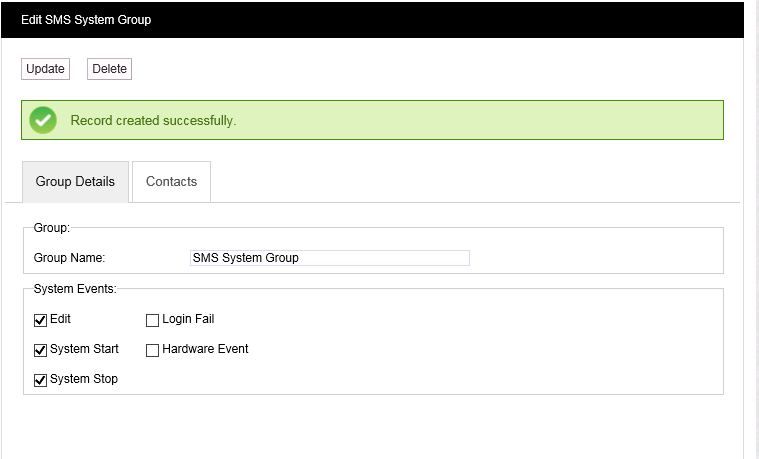
Note that window is now titled Edit SMS System Group. The only options now available are to delete the existing SMS System Group and create a new SMS System Group or edit the current group's parameters via this window.
1.Select the SMS System Group; displayed in the Group Name: dialog box in the Edit SMS System Group.
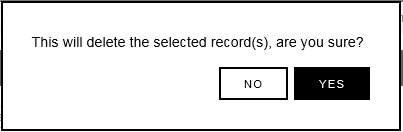
2.Click on the Delete button in the Edit SMS System Group window.
3.Click on Yes in the window displayed below:
Figure 197